
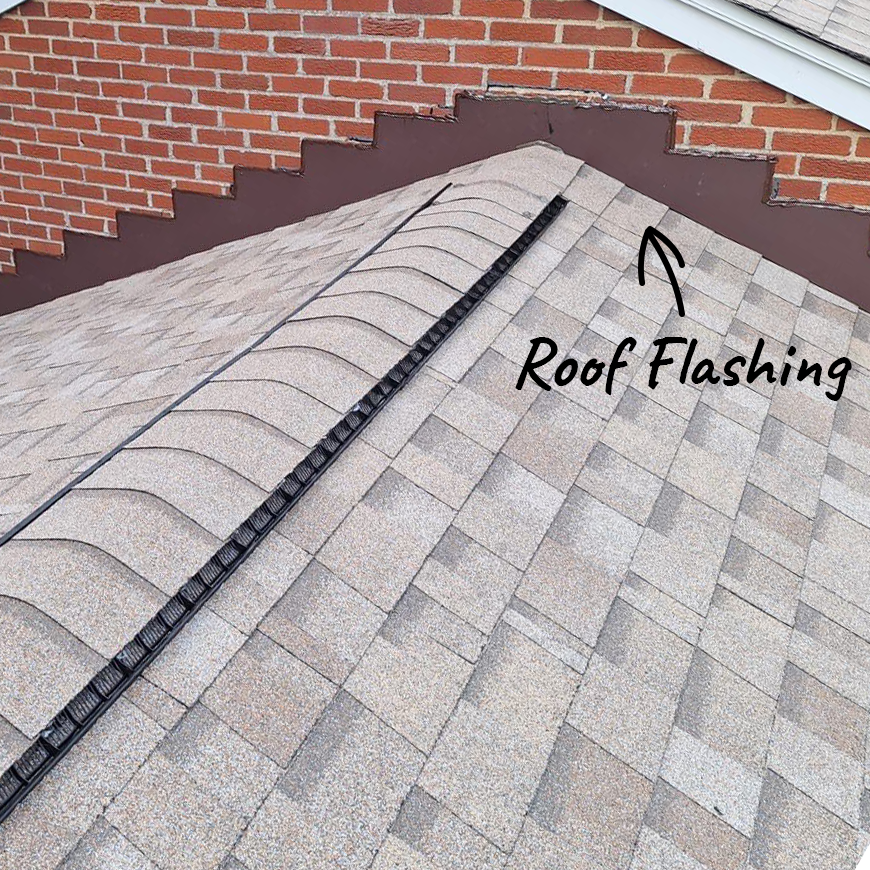
Roof flashing
What is Roof flashing
What is Roof Flashing?
Introduction to Roof Flashing
Roof flashing is one of the most important yet often overlooked parts of any roofing system. It refers to thin pieces of impervious material installed to direct water away from critical areas of a roof, such as joints, valleys, and edges. Without flashing, even the most durable roof would quickly develop leaks. Think of flashing as the unsung hero of your roof—it may not be as noticeable as shingles or tiles, but it plays a crucial role in keeping your home dry and damage-free.
When rain falls or snow melts, water naturally follows gravity, seeping into any gaps it can find. Flashing acts as a barrier and channel, guiding water away from vulnerable points and preventing it from entering your home. Over time, flashing has evolved from simple tar paper or makeshift materials into specialized metal, rubber, and composite products designed for durability and efficiency. Whether you’re building a new home or maintaining an older one, understanding roof flashing is key to ensuring your roof’s long-term performance.
Why Roof Flashing is Essential for Every Roof
Imagine your roof as a shield protecting your home. Shingles or tiles may cover most of it, but the joints, edges, and intersections are weak spots where water loves to sneak in. That’s where flashing comes in. It seals off these vulnerable areas and prevents leaks that could damage your ceilings, walls, insulation, and even your home’s structural integrity.
Flashing is particularly critical around chimneys, skylights, vents, and roof valleys. Without it, water would easily seep inside during storms. Even a tiny crack can lead to mold growth, wood rot, and expensive repairs. Homeowners who neglect flashing often face roof leaks far sooner than expected, even if the rest of the roofing material is in good condition.
Another reason flashing is so important is longevity. A properly installed flashing system can extend the life of your roof by decades. It works silently in the background, ensuring your home stays dry, energy-efficient, and structurally sound. In short, flashing is not just an accessory—it’s a necessity for every roof.
Types of Roof Flashing
Step Flashing
Step flashing is commonly used along the edges where a roof meets a vertical surface, like a wall or chimney. It’s called “step” flashing because it is installed in overlapping layers, resembling steps. Each small piece of metal flashing is tucked under the shingle above and bent against the wall. This layered design ensures that water flows downward over the flashing rather than seeping into the joint.
What makes step flashing so effective is its layered protection. Even if one section fails, the overlapping design ensures water is still directed away. This method has been used for decades because of its reliability, especially in areas where roofs meet complex structures. Homeowners who have additions, dormers, or multiple roof lines often rely on step flashing to keep everything watertight.
When installed properly, step flashing can last as long as your roof itself. However, improper installation—like skipping pieces or failing to tuck them under shingles—can cause leaks. That’s why many roofers consider it one of the most important flashing types to get right.
Valley Flashing
Roof valleys are areas where two slopes meet, forming a channel for rainwater to flow down. These valleys handle large volumes of water, especially during heavy rainfall. Without proper flashing, valleys can quickly become the first point of roof failure. Valley flashing is typically made of a wide strip of metal that runs the length of the valley, directing water safely into the gutters.
There are two main types of valley flashing: open and closed. In an open valley, the flashing is visible, and shingles are cut along the edges to expose it. In a closed valley, shingles cover the flashing completely. Both methods work, but open valleys are often preferred in regions with heavy rain because they allow water to flow more freely without obstruction.
Valley flashing is especially important in climates prone to snow and ice. When ice dams form, valleys are often the first place leaks occur. A properly installed valley flashing system ensures that even under harsh conditions, water doesn’t penetrate your roof.
Drip Edge Flashing
Drip edge flashing is a thin strip of metal installed along the edges of a roof, right under the shingles. Its job is simple but vital—it directs water away from the fascia and prevents it from seeping under the shingles. Without drip edges, water can creep back under the roofline, causing rot, mold, and damage to the soffit and fascia boards.
Building codes in many areas now require drip edge flashing for all new roof installations. Not only does it protect the roof edge, but it also improves the overall appearance of the roof by giving it a clean, finished look. Drip edges are available in different shapes, including L-shaped and T-shaped, to suit different roofing needs.
While drip edges may look insignificant, they make a huge difference in extending roof life. They’re especially important in regions with high winds, as they prevent wind-driven rain from being forced under the shingles. For homeowners, installing drip edge flashing is a small investment with big returns in long-term protection.
Vent Pipe Flashing
Every home has vent pipes sticking out of the roof, usually for plumbing or HVAC systems. These pipes penetrate the roof surface, creating a vulnerable spot where water can easily enter. Vent pipe flashing, also called a “boot,” is designed to create a watertight seal around these openings.
Most vent pipe flashings consist of a metal or plastic base with a rubber collar that fits snugly around the pipe. The collar flexes as the pipe expands and contracts with temperature changes, ensuring a tight seal year-round. Some even come with UV-resistant coatings to prevent sun damage over time.
One of the biggest issues with vent pipe flashing is deterioration. The rubber collar can crack or shrink after years of exposure, leading to leaks. Regular inspection is crucial to catch these problems early. Replacing a vent boot is inexpensive and quick, but ignoring it can result in costly interior water damage.
Chimney Flashing
Chimneys are one of the trickiest parts of a roof to protect. Because they extend vertically through the roof surface, water naturally pools around their base. That’s why chimney flashing is usually a multi-part system. It often includes step flashing along the sides, counter-flashing embedded into the brick, and sometimes saddle flashing on the uphill side.
Chimney flashing is notorious for being a common source of leaks. Poor installation, shifting bricks, or deteriorating mortar can all compromise the seal. Professional roofers often spend extra time on chimneys because they know how vulnerable these areas are.
A well-installed chimney flashing system can last decades, but it requires proper materials and craftsmanship. In many cases, copper flashing is preferred around chimneys because of its durability and resistance to corrosion. While it may cost more upfront, it saves homeowners from constant repairs in the long run.
Maintenance and Inspection of Roof Flashing
How Often Should You Inspect Flashing?
Roof flashing may be made of strong materials, but like every other part of your roof, it needs regular inspection and care. Experts recommend checking flashing at least twice a year—ideally in spring and fall. This schedule ensures you catch any damage that might have happened during harsh winter weather or summer storms. Additionally, you should inspect flashing after any major storm with heavy winds, hail, or rainfall, since these conditions can loosen or damage it.
Even if your roof looks fine from the ground, small cracks, loose nails, or bent flashing can go unnoticed until they lead to leaks. Flashing inspections don’t always require climbing on the roof—you can often spot warning signs from inside your home too. Water stains on ceilings, peeling paint near chimneys, or musty odors in the attic are all signs your flashing might need attention.
Staying on top of flashing inspections helps prevent minor issues from becoming major, expensive repairs. Think of it as an insurance policy—spending a little time checking your flashing now can save you thousands in water damage later.
Signs of Damage or Wear
Flashing damage can be sneaky, but there are clear signs you can watch for:
Rust or Corrosion – Metal flashing may develop rust spots, especially galvanized steel after years of exposure.
Cracks or Holes – These can form in plastic or rubber flashings around vents and pipes.
Loose or Missing Sections – Wind and storms may lift or tear away flashing.
Dried or Cracked Sealant – Sealants used with flashing wear down over time, creating weak points.
Water Stains Inside the Home – Brown patches on walls or ceilings often mean flashing has failed.
Shingle Damage Nearby – If shingles near flashing look worn or warped, it could signal water intrusion.
By catching these issues early, you can repair or replace flashing before leaks cause major damage to your roof’s structure.
Quick Repairs vs Full Replacement
Not every flashing problem requires a full replacement. In many cases, quick repairs can extend its life:
Small Rust Spots – Can often be cleaned and sealed with roofing cement.
Loose Flashing – Usually fixed by re-nailing or re-securing the flashing in place.
Cracked Sealant – Can be resealed with a high-quality roofing caulk.
However, if the flashing is extensively rusted, bent, or improperly installed, replacement is the smarter choice. Flashing that has failed multiple times or been patched repeatedly is a ticking time bomb. Replacing it ensures you won’t be dealing with recurring leaks.
A professional roofer can determine whether a repair is enough or if replacement is necessary. While repairs may save money short-term, investing in new flashing when needed guarantees stronger, long-term protection.
Cost of Roof Flashing
Average Cost of Materials
The cost of roof flashing depends heavily on the material. On average:
Aluminum Flashing – $2 to $5 per linear foot
Galvanized Steel Flashing – $3 to $8 per linear foot
Copper Flashing – $8 to $20 per linear foot
Lead Flashing – $10 to $25 per linear foot
Rubber or Plastic Flashing – $5 to $12 per unit (often sold as boots for vent pipes)
These prices may vary based on quality, thickness, and brand. While copper and lead are the most expensive, they also provide the longest lifespan. Homeowners on a budget may prefer aluminum or galvanized steel, which balance affordability with reliability.
Labor Costs for Installation
Labor costs can often exceed material costs. Installing roof flashing requires skill, precision, and sometimes dangerous work at steep roof angles. On average, homeowners can expect to pay:
$300 to $600 for chimney flashing
$200 to $500 for valley flashing
$100 to $300 for vent pipe flashing
$150 to $400 for drip edge flashing installation
Prices vary depending on location, roof complexity, and contractor rates. Hiring an experienced roofer may cost more upfront, but it ensures proper installation that prevents costly leaks later.
Factors that Affect the Price
Several factors can drive flashing costs up or down:
Roof Complexity – Multiple valleys, dormers, and chimneys mean more flashing work.
Material Choice – Copper and lead cost more but last longer.
Roof Accessibility – Steep or tall roofs require more time and safety equipment.
Repair vs New Installation – Installing flashing during a new roof build is cheaper than retrofitting it into an existing roof.
Local Labor Rates – Costs can vary widely depending on the region and demand for roofers.
Understanding these cost drivers helps homeowners budget realistically for flashing installation or replacement.