
Roof Felt
Roof Felt – Guide for Homeowners and Builders
What is Roof Felt?
Roof felt, often referred to as roofing felt or tar paper, is a protective material that sits between the roof deck and the final roofing material—whether that’s shingles, tiles, or another covering. It acts as a secondary barrier against water, helping prevent leaks in case the outer roof material is compromised. Typically made from a combination of natural fibers or synthetic materials coated with bitumen or asphalt, roof felt has been a cornerstone in roofing for over a century. Its primary role is to protect the underlying structure from moisture damage, extend the roof’s lifespan, and improve overall durability.
Think of roof felt like the unsung hero of a roofing system—it doesn’t usually get noticed, but it plays a critical role in keeping homes safe and dry. Without it, even minor damage to shingles or tiles could result in significant leaks, leading to costly structural repairs.
Brief History of Roof Felt
The use of roofing felt dates back to the 19th century, when builders began experimenting with saturated paper as an underlayment. Over time, this evolved into asphalt-saturated felts, which became the industry standard for decades. Early versions were relatively simple—layers of paper coated with tar to create a waterproofing effect.
By the mid-20th century, roofing felt had advanced significantly, offering greater strength and resistance to weathering. Today, synthetic versions are widely available, providing superior tear resistance, lighter weight, and enhanced performance in extreme climates. Despite the rise of new materials like roofing membranes, roof felt remains a go-to solution because of its affordability and effectiveness.
Why Roof Felt Still Matters Today
With the introduction of advanced synthetic roofing membranes, many assume traditional felt is outdated—but that couldn’t be further from the truth. Roof felt remains a reliable, cost-effective solution that continues to protect millions of homes worldwide. Its versatility means it can be used for everything from large-scale commercial buildings to small backyard sheds.
Moreover, roof felt adds an extra layer of insulation, helps prevent condensation buildup, and improves fire resistance in certain applications. Even in cases where high-end membranes are used, roof felt is often still recommended as a backup layer of defense. Simply put, it’s one of the most practical investments a homeowner or builder can make for long-term protection.
Types of Roof Felt
Traditional Bitumen Felt
Bitumen felt is the most common and widely used type of roofing felt. Made from a base of organic fibers or fiberglass saturated with bitumen (a sticky, petroleum-based material), it provides a durable and waterproof barrier. Bitumen felt is typically applied using nails, adhesives, or a torch-on method, depending on the specific product.
This type of felt is particularly valued for its cost-effectiveness and reliability. It has been trusted for decades in residential roofing and remains a strong choice for those looking for a balance between affordability and durability. However, it can be heavier and less flexible compared to modern synthetic options, which sometimes makes installation a bit more labor-intensive.
Modern Synthetic Roof Felt
Synthetic roof felt is a newer alternative designed to address some of the shortcomings of traditional bitumen products. Usually made from polypropylene or polyester, it is lighter, stronger, and more tear-resistant. Many synthetic felts come with anti-slip coatings, which make them safer for installers working on pitched roofs.
One of the biggest advantages of synthetic felt is its ability to withstand prolonged exposure to UV rays without breaking down as quickly as bitumen felt. This makes it especially useful in regions with high sun exposure or where roofing projects might take longer to complete. While it tends to be more expensive upfront, the long-term benefits often outweigh the costs.
Self-Adhesive Roof Felt
Self-adhesive roofing felt is designed for quick and easy installation, making it a favorite for DIYers and smaller projects like garden sheds or garages. Instead of requiring nails or a blowtorch, this felt comes with a peel-and-stick backing that bonds directly to the roof surface.
This option eliminates the need for hot works, which improves safety and speeds up installation. While self-adhesive felt may not always be suitable for large-scale roofing projects, it’s an excellent choice for smaller jobs or temporary fixes.
Torch-On Felt Systems
Torch-on felt systems involve heating bitumen-coated felt with a blowtorch to bond it directly to the roof surface. This creates a seamless, watertight layer that’s extremely durable and long-lasting. Torch-on felts are often used in flat roofing applications, particularly for commercial buildings or high-performance residential roofs.
Although highly effective, this method requires professional installation due to the risks involved with using open flames. When installed correctly, torch-on felt systems can last 20 years or more, making them one of the most durable felt options available.
Benefits of Using Roof Felt
Weather Protection
One of the most significant advantages of roof felt is its ability to shield your home from harsh weather. Whether it’s heavy rain, snow, wind, or even UV exposure, roof felt provides an additional layer of defense. If shingles or tiles get damaged or blown away during a storm, the felt helps prevent water from penetrating directly into the roof deck.
This added protection buys homeowners valuable time to repair visible damage without worrying about immediate water infiltration. In regions prone to severe weather, roof felt can be the difference between a minor inconvenience and thousands of dollars in repair costs.
Durability and Longevity
Roof felt is designed to withstand years of wear and tear, acting as a reliable underlayment that extends the life of the entire roofing system. While shingles or tiles may deteriorate faster due to direct exposure, the felt underneath continues to protect the structure.
Synthetic felts, in particular, can last significantly longer thanks to their resistance to tearing and degradation. By serving as a long-lasting barrier, roof felt reduces the frequency of major repairs and replacements, saving money in the long run.
Cost-Effectiveness
Compared to modern roofing membranes, roof felt is relatively inexpensive while still delivering excellent performance. This makes it an ideal choice for budget-conscious homeowners who want reliable protection without breaking the bank. Even with professional installation, felt roofing is generally more affordable than many alternatives.
When factoring in the lifespan of a roof and the potential savings from avoided water damage, the investment in roof felt pays off quickly. For many, it offers the perfect balance of affordability and functionality.
Extra Insulation Layer
Roof felt doesn’t just protect against moisture—it also adds an extra layer of insulation to the roof structure. This can help regulate indoor temperatures by preventing heat loss during winter and reducing heat gain during summer.
Additionally, the felt layer acts as a cushion between the roof deck and shingles, reducing the risk of abrasion and improving overall roof stability. This small but effective feature makes a noticeable difference in energy efficiency and comfort levels inside the home.
Common Applications of Roof Felt
Residential Roofs
Roof felt is most commonly used in residential buildings, serving as a protective underlayment beneath shingles, tiles, or slates. It provides homeowners with peace of mind, knowing that their roofs have a backup defense against leaks and moisture.
Whether you’re installing a brand-new roof or replacing an old one, felt is typically included as a standard part of the roofing process. It’s especially beneficial in areas with unpredictable weather, where sudden storms can compromise even the best roof coverings.
Commercial Roofing
In commercial construction, roof felt is often used as part of flat or low-slope roofing systems. Torch-on felts, in particular, are popular for their durability and long service life. For businesses, minimizing the risk of water damage is crucial, and roofing felt provides a cost-effective way to safeguard investments in large buildings.
Commercial roofing projects also benefit from the versatility of felt—it can be layered and combined with other waterproofing materials to create a highly resilient roofing system.
Garden Sheds and Outbuildings
For smaller structures like sheds, garages, and workshops, roof felt is a go-to solution. Self-adhesive or nail-on felt provides a quick and affordable way to waterproof outbuildings without requiring professional installation.
Because sheds and outbuildings often lack the same level of structural protection as houses, roofing felt is essential to prevent water ingress that could damage stored tools, furniture, or gardening equipment.
Temporary Roofing Solutions
In some cases, roof felt is used as a temporary measure during construction or repairs. For example, if a project is delayed due to weather, felt can be installed to protect the roof deck until the final covering is applied. Its affordability and ease of installation make it perfect for short-term use as well as permanent solutions.
Choosing the Right Roof Felt
Climate Considerations
Your local climate plays a huge role in determining which type of roof felt is best. In areas with high rainfall, thicker bitumen felt or synthetic felt with superior water resistance may be necessary. In sunny, hot climates, UV-resistant synthetic felts are often the better choice, as they withstand prolonged sun exposure without deteriorating.
For regions with snow and ice, durability is critical. Choosing a felt with added reinforcement can help prevent tearing under the pressure of ice dams or shifting snow loads.
Installation Process of Roof Felt
Tools and Materials Needed
Before starting the installation of roof felt, it’s important to gather all the necessary tools and materials. Having everything on hand will make the process smoother and prevent unnecessary delays. The basics include:
Roofing felt rolls (bitumen, synthetic, or self-adhesive depending on your choice)
Roofing nails or staples
Hammer or staple gun
Utility knife for cutting felt to size
Measuring tape to ensure accurate placement
Chalk line for guiding straight installations
Roofing adhesive or primer (if required)
Blowtorch (for torch-on systems)
Ladder and scaffolding for safe access
Protective gear including gloves, goggles, and non-slip boots
Preparation is key—without the right tools, mistakes like uneven installation or improper sealing can compromise the entire roof. Having quality materials ensures longevity, while the correct tools make the installation safe and efficient.
Preparing the Roof Surface
Before laying down roof felt, the roof surface must be properly prepared. A clean, smooth surface ensures better adhesion and reduces the risk of tearing. Start by:
Removing old roofing material – Clear away old felt, shingles, or debris.
Inspecting the roof deck – Check for rot, cracks, or weak spots in the wood. Replace any damaged sections before proceeding.
Drying the surface – Moisture can prevent felt from sticking properly. Ensure the roof is dry before beginning.
Laying base sheets – In some cases, a base sheet or primer may be required for torch-on or adhesive felts.
Taking the time to prepare the surface prevents future problems like bubbling, blistering, or water leaks. Think of this stage as laying the foundation—if it’s done poorly, the rest of the project will suffer.
Step-by-Step Installation Guide
The installation method varies slightly depending on the type of felt, but the general process follows these steps:
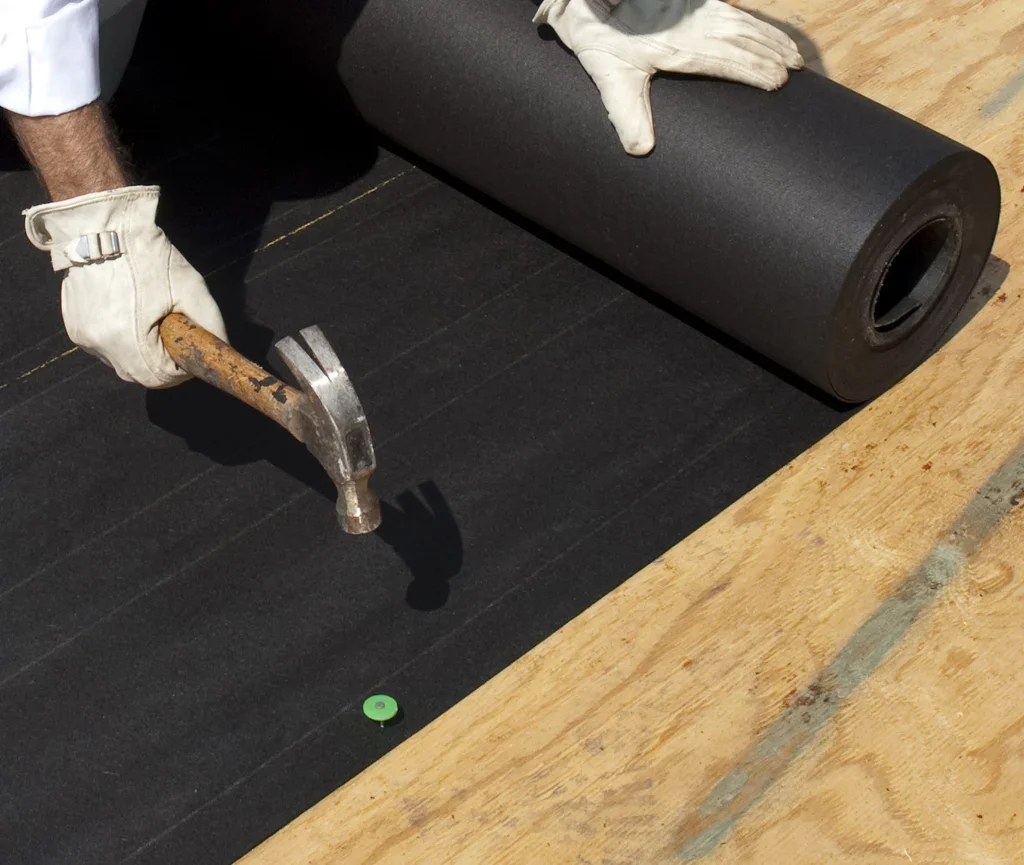
Start at the eaves – Roll out the first strip of felt horizontally, allowing it to overhang the edge of the roof slightly.
Secure the felt – Use nails, staples, or adhesive to fix the felt in place. Nails should be driven along the edges at intervals of about 6–8 inches.
Overlap each layer – When laying additional rows, overlap each one by at least 3–4 inches to prevent water seepage.
Cut and fit – Use a utility knife to trim excess felt around chimneys, vents, or roof edges.
Apply top layers – For multi-layer systems, repeat the process, ensuring each sheet overlaps correctly.
Seal the edges – Use adhesive or torching to seal seams, ridges, and corners.
This method ensures the roof is fully covered with no gaps, creating a watertight barrier. For torch-on felt, a professional should perform the job, as it requires precise heating to bond the layers securely.
Safety Precautions During Installation
Roof felt installation may look simple, but safety should always come first. Working at heights brings risks, and handling tools like blowtorches requires care. Keep these precautions in mind:
Always use a sturdy ladder and scaffolding.
Wear non-slip boots to prevent slipping on sloped or wet surfaces.
Avoid working on the roof during windy or rainy weather.
Use gloves and goggles when handling nails, adhesives, or torches.
For torch-on systems, keep fire extinguishers nearby.
By following these safety measures, you reduce the risk of accidents and ensure a smooth installation process.
Roof Felt Maintenance Tips
Regular Inspections
A roof is constantly exposed to the elements, so regular inspections are crucial to catch problems early. At least twice a year—typically in spring and autumn—walk around your property to check for visible signs of roof damage. Look for:
Loose or missing shingles/tiles that may have exposed the felt
Visible tears, cracks, or blisters in the felt itself
Signs of water stains on interior ceilings, indicating leaks
Excess debris or moss buildup on the roof surface
The sooner issues are spotted, the easier and cheaper they are to repair.
Spot Repairs vs. Full Replacement
Not every problem with roofing felt requires a full replacement. Small tears or punctures can often be repaired with roofing tape or adhesive patches. For larger sections of damage, replacing a portion of the felt may be enough.
However, if the roof felt is significantly aged, brittle, or showing widespread wear, a full replacement might be more cost-effective in the long run. Knowing when to repair and when to replace is key to balancing budget and durability.
Seasonal Maintenance
Different seasons bring different challenges for roof felt. In winter, snow and ice buildup can stress the material, while in summer, UV rays can cause cracking. To extend the lifespan of your roof felt:
Winter: Clear snow buildup promptly to avoid water seepage from melting ice.
Spring: Remove fallen branches, leaves, or moss that can trap moisture.
Summer: Check for blistering or bubbling caused by heat expansion.
Autumn: Clear gutters regularly to prevent water pooling on the roof.
Consistent seasonal maintenance helps prevent minor issues from turning into major headaches.
Extending Roof Felt Lifespan
The average lifespan of roof felt ranges from 10 to 20 years, depending on the type and installation quality. To maximize longevity:
Invest in higher-quality synthetic felts with UV protection.
Ensure proper ventilation in the attic to reduce condensation damage.
Regularly check and reseal edges where felt overlaps.
Keep trees trimmed to prevent branches from rubbing against the roof.
By taking these proactive steps, homeowners can significantly extend the life of their roofing felt and avoid costly premature replacements.
Common Problems with Roof Felt and Solutions
Blistering and Bubbling
Blistering occurs when air or moisture gets trapped beneath the felt, creating raised bubbles. This is often caused by improper installation or insufficient surface preparation. While small blisters may not immediately affect performance, larger ones can eventually split and lead to leaks.
Solution: Small blisters can be cut open, dried out, and resealed with adhesive. For extensive blistering, replacing the affected section may be the best option.
Tears and Rips
Strong winds, falling branches, or foot traffic during maintenance can cause tears in roofing felt. Left untreated, these tears can allow water to penetrate and damage the roof deck.
Solution: Small tears can be patched with roofing tape or bitumen adhesive. For larger rips, it’s best to cut out the damaged section and replace it with new felt.
Water Pooling Issues
Flat roofs covered with felt are particularly prone to water pooling, also known as “ponding.” Over time, standing water weakens the felt, leading to leaks.
Solution: Improving roof drainage, adding tapered insulation, or re-laying the felt with better slope adjustments can solve the issue.
Mold and Algae Growth
When moisture sits on felt surfaces for long periods, mold and algae can form. This not only looks unsightly but can also compromise the felt’s strength.
Solution: Regular cleaning and the use of anti-fungal treatments can keep mold and algae at bay. For severe cases, replacing affected sections may be necessary.
Roof Felt vs. Alternatives
Roof Membranes
Modern synthetic roofing membranes, such as breathable underlays, are becoming increasingly popular. They allow moisture from inside the house to escape while preventing water from entering. While more advanced, they are often pricier than traditional felt.
EPDM Rubber Roofing
EPDM (ethylene propylene diene monomer) is a highly durable rubber roofing material commonly used on flat roofs. It can last 30+ years, making it a strong alternative to felt. However, it comes at a higher cost and requires specialized installation.
Fiberglass (GRP) Roofing
GRP roofing offers excellent durability and a seamless finish, making it nearly maintenance-free. It’s resistant to cracks, leaks, and weather damage. On the downside, it’s more expensive than felt and usually requires professional installation.
Metal Roofing Sheets
Metal sheets, such as steel or aluminum, provide long-lasting protection and can be used for sheds, garages, and even houses. They are durable but tend to be noisier in rain and can be costly compared to felt.